
 Games


PoE 3.30 Reliquarian: League Start to Endgame and the Uniques to Prepare
category:Path Of Exile
Nov-12-2026 Source: MMOSO
Path of Exile 3.30: Covens of Umbra launches on November 13, 2026 (PST). Reliquarian is the Scion ascendancy that turns Unique item effects into passive nodes, and the unique pool rotates every league. The 3.30 lineup is built around effects you can take on the tree while keeping those item slots free for something else.
This guide covers how the ascendancy comes online from the campaign into maps, which nodes to take at each lab, and which uniques are worth preparing. For the league mechanic itself, start with our PoE 3.30 Covens of Umbra Guide.
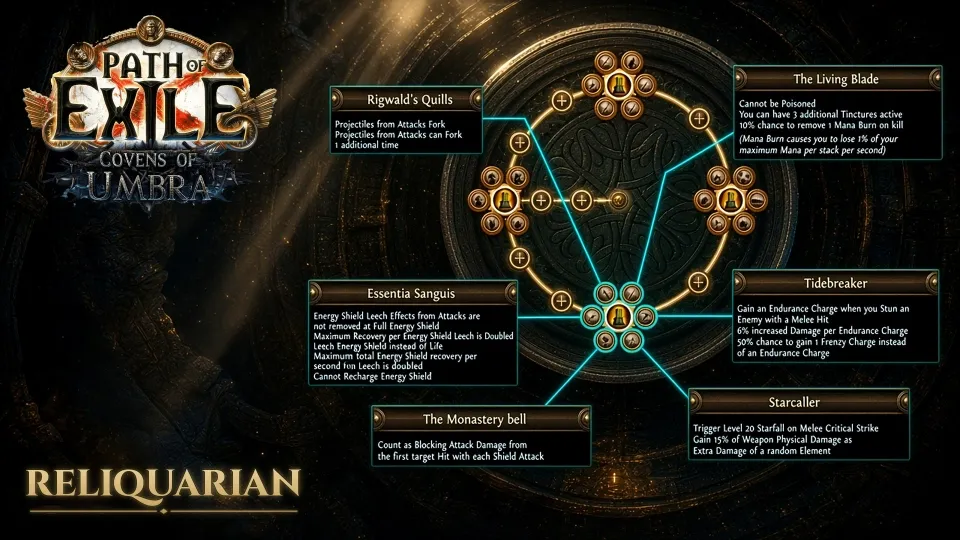
How Reliquarian Works in 3.30
The tree layout is unchanged: four clusters and the same point budget. What changes is the entire unique pool, so last league's Reliquarian setups do not carry over.
Your first Labyrinth grants two Ascendancy Passive Skill Points. The character will feel like a normal Scion until around level 55, when the second Lab lets you pick your first Unique effect from the Reliquarian tree. The third lab, around level 68, is the real identity point. You travel either up into the caster cluster or down into the martial cluster and pick one of six effects. You cannot take both paths, because the travel points spend the rest of your budget.
That restriction matters this league. Two of the stronger payoff nodes, Festering Resentment and The Monastery Bell, sit on opposite sides of the tree. If you want both effects at once, you have to equip one of those uniques and take the other as an ascendancy node.
The fourth Labyrinth unlocks your final Ascendancy allocation. You can invest in the Jewellery Display for another Unique-derived effect or use the available points toward a Bloodline Ascendancy, depending on your build.
How to Play Reliquarian from League Start
Do not expect Reliquarian to define the character in the early acts. Clear the first lab for the two passive points, then use a simple leveling skill through the campaign. Freezing Pulse, Spark, or Storm Blast Mines are all workable until the third lab comes online.
Recommended League Start: Death's Door + The Crustacean's Call
Take Death's Door at the second lab, then The Crustacean's Call at the third lab. This is a straightforward league-start route if you want to transition into Crab Totems after the third Labyrinth and do not have a specific endgame build planned yet.
The two nodes work together for a reason:
- Death's Door provides 25% increased movement speed, immunity to Bleeding, and one additional maximum Endurance Charge. Bleed immunity helps in Acts 9 and 10, and the boot slot stays free.
- The Crustacean's Call gives your totems more movement speed, raises your maximum totem count, and turns skills supported by Spell Totem into crab totems.
- You do not need to equip The Crustacean's Call staff. The ascendancy already provides that effect.
- That leaves the weapon and off-hand slots free for gear that helps the character grow, such as a +2 wand or sceptre and a +1 totem shield.
Level with a spell through Act 10, finish the third lab, then swap to crab totems.
If you prefer projectile attacks instead of totems, swap the third-lab pick to Rigwald's Quills. It lets projectiles from attacks fork an extra time, which helps bow, wand, and other projectile attack skills clear maps without spending a support gem on Fork. Death's Door can still be the second-lab pickup on that route.
Take a different first-cluster node only when the endgame plan needs it:
- Crown of the Inward Eye if you want increased maximum Life, Mana, and global Energy Shield, plus the three Transfiguration effects. This is a better second-lab pick for some caster and hybrid scaling setups, but it is not the default league-start choice.
- Shadowstitch if you plan to stack corrupted items for Life and Energy Shield later. It is a poor campaign node, because you will not have many Vaal items yet.
- The Brass Dome if you want extra maximum elemental resistances and no extra damage from Critical Strikes. While this effect is allocated, Strength provides no bonus to Maximum Life, so builds that rely on Strength for life scaling need to account for that trade-off.
- The Scales of Justice only if you already plan a Life-and-Mana stacking setup. It falls off unless that plan is real.
How to Choose Your Endgame Path After the Third Lab
Pick the third-lab cluster based on the skill you want to play in maps, not on a node that looks strong in isolation. The table below is a directional guide to help you choose. It is not a claim that every combination has been fully proven in live 3.30 trade play.
| Reliquarian Effect | Best suited to | When to take it |
| The Crustacean's Call | Spell Totem / crab totem | First choice for league start and map clear |
| Festering Resentment | Triggered spell poison | Only if the build is built around triggers and poison |
| Foulborn Tremor Rod | Mines | Mine builds |
| United in Dream | Poison minions | Only if the rest of the build already supports minions |
| Rigwald's Quills | Projectile attacks | First choice for projectile attack mapping |
| The Monastery Bell | Shield attacks | Shield-attack builds |
| Essentia Sanguis | Energy Shield leech attacks | Attack builds that leech Energy Shield |
| Tidebreaker | Slams and melee stun | Slam or stun-based melee |
| Starcaller | Melee critical strikes | Melee crit builds |
| The Living Blade | Tinctures | Tincture builds |
Shade of Solaris and The Draugur's Lantern are more specialized caster options. Most players can skip them on a first character.
If your plan needs both Festering Resentment and The Monastery Bell, decide before the third lab which unique you can actually equip, then take the other effect on the tree.
For the fourth lab, The Arkhon's Tools is the general-purpose pickup, because it adds a Scorching Skitterbot and increases the effect of non-damaging ailments from Skitterbots. Praxis helps mana-heavy skills. Choir of the Storm, Natural Hierarchy, Blackflame, and Box of Jewels are for more specific conversion, ignite, or ailment setups.
Once you are in maps, your Atlas plan matters as much as the ascendancy path. Scarabs are gone in 3.30, so read how Threads of Creation change Atlas farming.
Which Uniques Should You Prepare for Reliquarian?
The unique whose effect you take on the tree is not the unique you need to buy. That is the main gear rule for Reliquarian. The ascendancy already gives you that Unique effect, so you should spend currency on the slot that node sets free, and on pieces your build still has to equip.
The freed slot is only a good upgrade if it matches the build. A boot unique is a strong follow-up to Death's Door on a league starter, but it is not automatically the right endgame boot. A +2 wand only matters if you are actually playing crab totems. Use the table as a starting point, not as a list of items every Reliquarian should buy.
| Ascendancy effect | Slot it frees | What to prepare if it fits the build |
| Death's Door | Boots | Seven-League Step for league-start movement, or rare boots with the life, resistances, and speed your setup needs later |
| The Brass Dome | Body armour | A high Energy Shield rare chest, once you are ready to use that defence setup. Do not wear The Brass Dome unique if you already took the node |
| The Crustacean's Call | Weapon and off-hand | A +2 wand or sceptre and a +1 totem shield, on the crab totem route |
| Rigwald's Quills | Quiver | A high-damage rare quiver, on projectile attack builds. You do not need to buy Rigwald's Quills itself if you already took the node |
Best Reliquarian Uniques to Buy Before League Start
Split the shopping list by when you will use the item.
1. Campaign leveling
Tabula Rasa, Goldrim, and Wanderlust are enough to get through the acts and the first two labs. These are cheap, general-purpose uniques and do not depend on which Reliquarian path you take.
2. Early mapping
Prepare this layer around the third-lab route, not around every freed slot at once.
- On the recommended totem route (Death's Door + The Crustacean's Call), look for Seven-League Step, a +2 wand or sceptre, a +1 totem shield, and a chest such as Dialla's Malefaction or Soul Mantle.
- On the projectile attack route (Death's Door + Rigwald's Quills), keep Seven-League Step for the free boot slot and put the currency into a real quiver or bow upgrade. Skip Rigwald's Quills itself unless you chose a different third-lab node and still want that effect.
- If you took Crown of the Inward Eye instead of Death's Door, Crown of Eyes is a strong helmet pairing, because it lets spell damage also scale attacks.
3. Endgame upgrades
Once the atlas is open, buy around the final skill, not around a generic Reliquarian checklist. That usually means a 6-link chest, better jewels, flasks, and the specific unique or well-crafted rare that fills the slot your ascendancy left open. If you later respec to The Brass Dome, the upgrade is a high Energy Shield rare body armour, not the unique chest.
You can find these Unique Items, 6-link chests, gems, and flasks on the PoE 3.30 items page at MMOSO when you are ready to kit the character out.
Frequently Asked Questions
Do I need to buy the unique I take on the Reliquarian tree?
No. The ascendancy already gives you that Unique effect. Spend your currency on the gear that goes in the slot you just freed, or on a unique your path still has to equip.
Can one Reliquarian take both the caster and martial clusters?
No. The travel points on either side use the rest of your ascendancy budget, so you choose one cluster at the third lab. If two effects on opposite sides are both required, equip one unique and take the other as a node.
When does a Reliquarian league starter feel complete?
The first lab grants two Ascendancy Passive Skill Points. The second lab, around level 55, is where the first Unique effect comes online. The third lab, around level 68, is when the main skill and the freed weapon or chest slot should come together.
What should I prepare first for 3.30 Reliquarian?
Start with campaign uniques such as Tabula Rasa, Goldrim, and Wanderlust. If you are following the recommended Death's Door + The Crustacean's Call route, add Seven-League Step, a totem weapon setup, and a chest like Dialla's Malefaction or Soul Mantle for early maps.
Recommended news
-
PoE 3.30 Covens of Umbra Guide: League Mechanics & Tips
Nov-09-2026 -
PoE 3.30: How Threads of Creation Change Atlas Farming
Nov-09-2026 -

PoE 3.29 League End: Challenges, Rewards and What to Do Before 3.30
Oct-17-2026 -

Path of Exile 3.29 Trarthus Mercenaries Guide: Duel Rewards & Farming Tips
Oct-10-2026 -

Path of Exile 3.29: Why Scion's Luminary Ascendancy Turns Mercenaries Into a Second Character to Gear
Sep-24-2026 -

PoE 3.29 Currency Farming Guide: How to Choose the Right Strategy
Sep-10-2026


Thank you for using this website through social login. In order to better use the functions of mmoso, please add your email address first. If you have questions, please consult our customer service.


