


 Diablo 2: Resurrected
 Diablo 4
 Path Of Exile 2
 Animal Crossing
 Path Of Exile
  Last Epoch
  FC 25
FC 25  WoW WotLK Classic
  Runescape
  WOW Classic SOD
  Steam
Steam  StarRupture
  Elden Ring
 Are you sure you want to delete all items?
Diablo II Resurrected: The guide of Act I the third to sixth quests.
category:Diablo 2: Resurrected
Mar-26-2024 Source: MMOSO
Welcome to the Act I Walkthrough Guide for Diablo II: Resurrected Ladder Season 6. Today,we will continue to talk about the first act of the five act task in detail. And this guide will cover Act I the third to sixth quests and how to complete them.
Quest 3: The Search for Cain (Recommended Level: 7-8)
After speaking with Kashya, go and talk to Akara. She will tell you all about Deckard Cain and task you with saving him from the monsters who have taken over Tristram. This long, roundabout task is optional, but doing it is highly recommended because Cain will identify your items at no charge once you save him.
Your first task is to reach the Stony Field. Go back to the Cold Plains and follow the road to this new area if you haven’t already gone in and grabbed the Waypoint during the previous quest. The Stony Field is home to Moon Clan Goatmen, Hungry Dead, Skeletons, Fallen, Fallen Shamans, and Dark Archers. This is also when Carvers start to pop up which is just a slightly tougher version of the Fallen. For now, they don’t have accompanying Shaman, so they aren’t too tough to deal with. You’ll also run into Foul Crows, which spawn from Foul Crow Nests. Until you kill the Nests, the Crows will continually respawn. Either take the Nests out or just run past them.
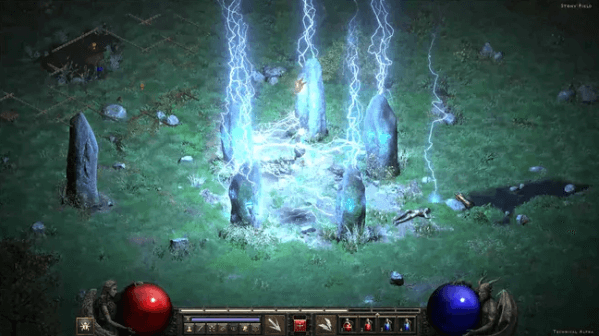
As you walk along the road, you will likely notice a circle of six large stones. This is your eventual destination, but for now, you don’t know how to activate them. If you want, go ahead and take the enemies down around the Cairn Stones now to save you time later. Keep in mind that this area is being guarded by a Carver named Rakanishu who is notable for his ability to fire out charged lightning bolts when hit. These can do lethal damage at low levels, so have plenty of potions ready.
Whether you deal with Rakanishu now or later, you eventually want to follow the road to the Underground Passage. This cave system is much bigger than the Den of Evil and contains Skeleton Archers, Vile Hunters, Fallen, Carvers, and Misshapen. None of these are too tough on their own, but within the tight confines of the cave, you can quickly become overwhelmed. Don’t be afraid to drop a TP and get out if you need a second to catch your breath.
Fight through until you find the entrance to the Dark Wood. The Underground Passage does have a second level, so make sure you’re leaving through the correct entrance. You don’t need to go down to the second level of the cave if you don’t want to. It just contains some extra enemies and loot to pick up.
Once you’re in the Dark Wood, you want to find two things: the Tree of Inifuss and the Waypoint. The Tree of Inifuss is where you’ll find the scroll that tells you how to open the portal to Tristram. Unfortunately, it’s located somewhere in the middle of the area’s forests, so we can’t really tell you exactly where to look since the map is randomized. It’s being guarded by a unique brute named Treehead Woodfist who spawns with both Extra Strong and Extra Fast. Plus, he comes with three tough minions. You don’t have to kill him if you don’t want to, but his loot is usually good enough that we recommend it.
The Waypoint here can be a bit tough to track down as well because it’s not on a path. Make sure to hunt it down though, so that you don’t have to take a walk back through the Underground Passage after you finish this quest.
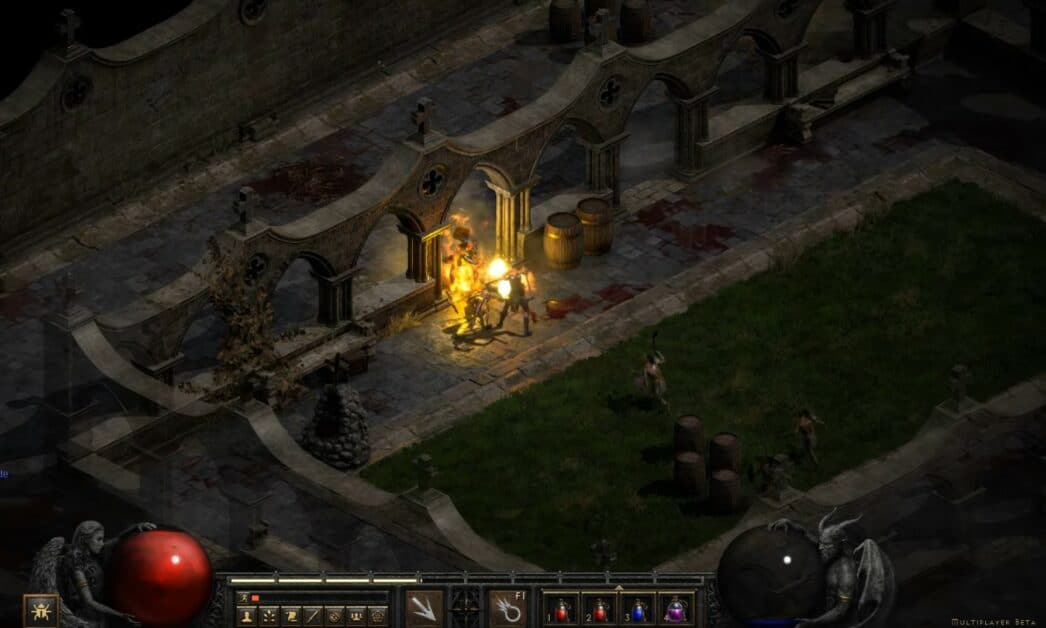
With the scroll in hand, go back to town and talk to Akara. She’ll reveal the order in which you need to touch the stones to open the portal to Tristram. Head back to the Stony Field and do just that. Then, head through the red portal and prepare to rescue Deckard Cain.
Tristram is home to a sizeable horde of enemies. You’ll come up against Carvers, Carver Shaman, Returned and/or Skeleton Archers, and potentially some Night Clan Goatmen. The middle of town is home to several Champion-level monsters, who will put up a tough fight. Finally, the area is home to Griswold, the blacksmith from the first game, who automatically casts an Amplify Damage curse on anyone close to him. Be careful in this area as the enemies can get overwhelming quickly.
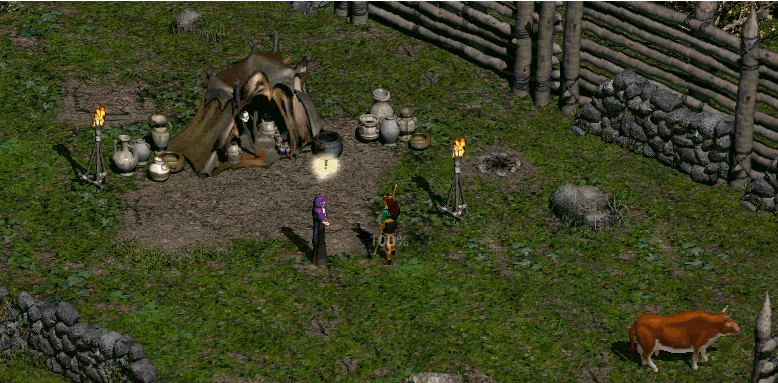
When it’s safe (or even if it isn’t), click on Cain’s cage to let him out. He’ll take his own TP back to the Rogue Encampment, leaving you to either mop things up or follow him with your own TP. When you get back to town, talk to Cain to complete the quest. He will now identify any item you bring to him for free.
Quest 4: The Countess (Recommended Level: 8-10)
After freeing Cain, your next objective is to take down The Countess. The game only gives you this quest if you found a pedestal in the Stony Field telling you to do it. It takes a bit of hunting to track pedestal down, but you don’t actually have to find the pedestal to do the quest so don’t worry if you missed it. From the Dark Wood, you need to continue on to the Black Marsh. Search around this map until you find The Forgotten Tower. Once you find it, this optional quest will pop up in your log. You should also make sure you get the Black Marsh waypoint before you go on.
Inside The Forgotten Tower, you’ll find an even more powerful version of Fallen called the Devilkin, though they don’t have their Shaman at this point. It’s also littered with Night Clan Goatmen, Vile Archers, and Ghosts. The latter monster drains your mana when they hit you, making them a bit tougher for caster characters.
The boss, your target, is located on the top floor of the tower. She is joined by several minions and uses fire-enchanted attacks at close range. Either keep your distance or bring several health potions. Importantly, The Countess is a good source for early rune drops, which you can then use to empower your gear. She also will drop several pieces of gear that could be an upgrade if you’re lucky. Many players like to kill the Countess multiple times to get runes they will want later, by remaking new games and killing her again.
Quest 5: Tools of the Trade (Recommended Level: 12-15)
After dealing with The Countess, be sure to speak with Charsi the blacksmith back at the Rogue Encampment. She will tell you about the hammer she left behind when fleeing the Monastery and ask you to retrieve it. To make your way to this optional quest, you need to go from the Black Marsh to the Tamoe Highlands and then work your way through the Barracks. Along the way, you’ll meet upgraded versions of most of the normal monsters you’ve faced so far, but you can mostly run past them as long as you’re around level 12-15. At that point, you’re probably ready to clear the first Act, so there’s no reason to grind if you don’t want to.
That said, the Barracks can serve as something of a bottleneck for new players. Like the Underground Passage, this area is tightly packed with enemies and doesn’t give you much room to breathe. Try to take things slow as you fight off the monsters, and watch out for Bone Mages and Bone Archers. They can do a lot of damage from afar if you don’t deal with them.
The boss of this area is The Smith who wields the hammer you’re seeking. Not only does he hit hard, but he spawns with a sizeable horde of minions. Try to draw him away and deal with him on his own. Don’t be afraid to drop a TP and retreat to the Rogue Encampment for a breath or to refill your potions. Once he and his horde are dealt with, pick up the Horadric Malus and take it back to Charsi. She will then offer to imbue one of your non-magical items into a random rare item. You can do this now or save it for later when you have more high-quality gear.
Quest 6: Sisters to the Slaughter (Recommended Level: 14-16)
This is the only quest in Act I that you actually must complete. After dealing with The Smith, continue through the Barracks into the Jail. This area has three levels you’ll need to work through, which contain even more of the monsters you’re used to. The one notable addition is mana-draining Wraiths, which are just a tougher version of the Ghosts you fought in The Forgotten Tower. After you clear the Jail, you’ll be in The Inner Cloister. Make sure to pick up the Waypoint here and go and refill potions if you’re running low.
Then head into the Cathedral and make your way to the right-hand side of the map to head down into the Catacombs. This sprawling dungeon contains several new monsters. There are Arachs, The Banished, Afflicted, Ghouls, and Rat Men. On their own, none of these are too deadly, but having to learn how all of these different enemies work at once while also exploring an area that can lead to you feeling overwhelmed can be tough. Take your time and don’t be afraid to pop back to town for a breath. Make sure to pick up the Waypoint on the second level of the Catacombs so that you can speed up your corpse run if you happen to die.
Eventually, you’ll make your way to the fourth floor of the Catacombs. When you enter, you’ll be in an area where you’re safe. Take this time to drop a TP that you can use if you run into difficulties in the next room. Walk through the door and take some time to clear out all of the Dark Ones and their Shamans along with the Zombies. Make sure you don’t open the next door until they’re all dealt with or you’ll activate the Act boss, Andariel.
When everyone is dead, head through that door and face Andariel. Your first objective is to draw her closer to the door. You don’t want to activate all of the other enemies in the room with her if you can help it. Once she’s sauntered over to you, your best bet is to hit her with any fire attacks you have. She is very weak to fire and will go down quickly if you can hit with everything you have.
If you don’t have access to fire-based skills, be ready with lots of potions because her attacks deal a lot of poison damage. Fortunately, this damage is slow-acting, so you can run through a portal back to town and be safe if you need to. Once she’s killed, grab your loot, head to town, and talk to Warriv to move onto Act II. Andariel is a popular enemy to kill over and over, because she drops good loot. If you've just completed the walkthrough, you probably won't want to do that (yet,) but we have a guide on how to farm her if you want to check it out.
Recommended news
-

Diablo 2 Resurrected Farming Guide - Best Loot Locations In D2R
Jul-20-2026 -

Diablo II: Resurrected: The guide of Act I The first two quests.
Mar-25-2024 -

Diablo 4: Druid Shapeshifter Nature Wrath build in Diablo 4.
Mar-23-2024 -
Path of Exile 3.24 : Necropolis -- A general introduction to the main changes in the new season
Mar-22-2024 -
.jpg)
Last Epoch: The best build guide for Necromancer .
Mar-21-2024 -
Path of Exile (POE) 3.23 -- Discussion of some indestructible defense systems.
Mar-20-2024


Thank you for using this website through social login. In order to better use the functions of mmoso, please add your email address first. If you have questions, please consult our customer service.


